The Ultimate Setup Guide for Your X Pro3
Introduction
The electronics landscape is often defined by a relentless pursuit of clinical perfection. However, every few years, a device enters the market that prioritizes the visceral experience of the user over raw technical specifications. The X Pro3 is precisely that kind of device. Targeted at enthusiasts who value the tactile relationship between the operator and the machine, this piece of hardware represents a bold departure from conventional design philosophies. It is a tool designed for those who want to be present in the moment rather than buried in a digital interface. Establishing the correct setup for such a specialized device is not merely about toggling switches; it is about calibrating the hardware to match a specific creative philosophy. This guide provides a comprehensive roadmap for optimizing the X Pro3 to ensure it performs as an extension of the user’s own intent.
What makes this electronics masterpiece particularly compelling is its commitment to the "pure" experience. By intentionally obscuring certain digital conveniences, it forces a reliance on muscle memory and fundamental principles. For the modern buyer, this presents a unique challenge: how to configure a device that seems to fight against the trend of over-automation. Whether used for documenting urban environments or capturing the nuances of a remote landscape, the setup requires a balance of speed, reliability, and subtle customization. In the following sections, we will explore the technical nuances of the hardware, analyze its performance in real-world scenarios, and provide a granular walkthrough of the optimal configuration settings.
Detailed Product Analysis: Engineering for Experience
The X Pro3 is built upon a hybrid architecture that balances legacy industrial design with cutting-edge internal processing. At its core is a high-resolution sensor paired with a powerful image processing engine, yet the exterior is shielded by titanium plates that offer a durability rating far exceeding standard magnesium alloy builds. This choice of materials is not just for aesthetics; titanium provides a strength-to-weight ratio that makes the device resilient against the rigors of travel and frequent handling. The inclusion of a Duratect coating on specific variants further enhances scratch resistance, addressing a major concern for buyers who intend to use the device in demanding environments.
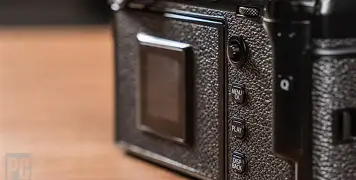
The most debated feature of the hardware is the "hidden" LCD screen. Unlike traditional electronics that place a large, glowing panel on the rear, this device requires the user to flip the screen down 180 degrees to view it. When closed, a small sub-monitor displays basic status information, mimicking the look of a film box indicator. This design choice is a physical manifesto against "chimping"—the habit of constantly checking the screen after every action. By hiding the screen, the device encourages a flow state. The viewfinder is equally innovative, featuring a hybrid system that allows users to toggle between an optical window and an electronic display. The optical mode provides a zero-lag, clear view of the world, while the electronic mode offers a precise preview of the final output, including exposure and color simulations.
Under the hood, the processing capabilities are tuned for speed. The autofocus system utilizes a massive array of phase-detection pixels that cover nearly the entire frame, ensuring that the device can track subjects even in low-light conditions down to -6EV. This makes it an exceptional tool for evening street scenes or dimly lit interior documentation. The buffer depth and write speeds are optimized for high-performance storage cards, allowing for sustained operation without the hardware locking up during critical moments. Power management has also seen refinements, though the high-performance nature of the hybrid viewfinder remains a primary draw on the battery. Therefore, part of any serious setup must include a strategy for power conservation and management.
Pros and Cons
- Unmatched Durability: The titanium construction provides a level of structural integrity and weather sealing that is rare in consumer-level electronics.
- Hybrid Viewfinder Innovation: The ability to switch between optical and electronic views allows the user to adapt to lighting conditions and personal preference instantly.
- Exceptional Color Science: The internal processing engine offers industry-leading color profiles that reduce the need for extensive post-processing.
- Tactile Control Layout: Physical dials for exposure compensation, shutter speed, and ISO provide a mechanical feedback loop that digital menus cannot replicate.
- Controversial Screen Design: While the hidden LCD promotes focus, it can be a hindrance for those who frequently perform low-angle or tripod-mounted work.
- Battery Life Constraints: The processing power and high-refresh-rate EVF mean that users must be diligent about carrying spares for long days of use.
- Single-Purpose Ergonomics: The rangefinder style is excellent for right-eyed users but can be less comfortable for those who use their left eye for viewing.
Technical Comparison Table
| Feature | X Pro3 Standard | Typical Competitor (Mid-Range) | High-End Professional Alternative |
|---|---|---|---|
| Body Material | Titanium with Magnesium Frame | Magnesium Alloy / Polycarbonate | Full Magnesium Alloy |
| Viewfinder Type | Hybrid (Optical + Electronic) | Electronic Only (EVF) | Optical or High-Res EVF |
| Low-Light AF | Down to -6.0 EV | Down to -3.0 or -4.0 EV | Down to -5.0 or -7.0 EV |
| Display Style | Hidden 180-degree Tilt | Fixed or 3-way Tilt LCD | Fully Articulated or Fixed |
Comprehensive Setup Guide
To get the most out of the X Pro3, one must look beyond the default factory settings. The goal of a custom setup is to minimize the time spent in menus and maximize the time spent interacting with the subject. This involves configuring the physical buttons, the "Quick Menu," and the internal software parameters to create a seamless workflow.
Looking for the best Electronics deals on Amazon?
Browse Now →1. Physical Interface Customization
The device features several "Fn" (Function) buttons that can be mapped to almost any setting. A popular configuration for professional users involves assigning the top button next to the shutter to "Drive Settings" or "ISO," though the latter is already handled by the physical lift-and-twist dial. Instead, consider using the front-facing toggle switch for engaging the "Digital Teleconverter" or "Depth of Field Preview." Mapping the rear command dial to handle aperture (if using lenses without an aperture ring) or exposure compensation (if the physical dial is set to 'C') allows for a more modern handling experience when the situation demands it.
2. The Hybrid Viewfinder Calibration
Setting up the viewfinder correctly is vital. In the "Screen Setup" menu, ensure that the "Natural Live View" is turned off if you want to see exactly how your color simulations look, or turned on if you prefer a view that mimics the dynamic range of the human eye. For the Electronic Viewfinder (EVF), set the "Performance Mode" to "Boost" and select "Refresh Rate Priority." This increases the frame rate to 100fps, making the display feel much more fluid and reducing eye strain. In Optical Viewfinder (OVF) mode, enable the "Bright Frame Simulation" to see the active area of various focal lengths, and utilize the "ERF" (Electronic Rangefinder) feature—a small digital window in the corner—to confirm focus and white balance while still using the optical glass.
3. Optimizing the Color Profiles
The internal "Film Simulations" are a primary reason many choose this platform. To create a signature "look" that saves time in the editing suite, navigate to the "Image Quality" menu. Adjust the "Grain Effect" to "Weak/Small" for a subtle texture, and use the "Color Chrome Effect" and "Color Chrome Blue" settings to add depth to saturated colors and skies. For monochrome work, the "Acros" simulation paired with a "Yellow Filter" setting produces stunning contrast that mimics high-end black-and-white film stocks. These settings should be saved into one of the seven "Custom Profiles" (C1 through C7) for quick access via the Quick Menu.
4. Focus and Drive Configuration
For street and candid documentation, "Back Button Focus" is a game-changer. Reassign the "AF-L" button to perform AF-ON and set the shutter button to only trigger the release. This allows you to pre-focus on a specific distance and wait for the subject to enter the frame without the device trying to refocus at the last second. Additionally, configure the "AF-C Custom Settings" to "Set 2" (Ignore Obstacles) if you are working in crowded environments where people might walk between you and your subject across the frame.
Buying Guide: Is the X Pro3 Right for You?
When considering the purchase of high-end electronics like this, it is important to identify your specific use case. The X Pro3 is not a "do-it-all" device; it is a specialist tool. Prospective buyers usually fall into three categories: current system users looking for an upgrade, film devotees transitioning to digital, and professional documentarians who need a rugged, discrete secondary body.
Shop the latest Electronics picks on Amazon.
View Offers →Buyers care most about durability. If you are frequently in rain, dust, or snow, the extensive weather sealing and titanium plates make this a superior choice compared to standard mirrorless options. Another key factor is portability. The rangefinder form factor is slimmer than a DSLR or a centered-viewfinder mirrorless, making it much easier to slide into a small bag or wear under a jacket for discrete operation. User Interface is the final pillar; if you enjoy manual dials and are frustrated by the trend of putting every control behind a touchscreen, the tactile nature of this hardware will be immensely satisfying.
However, if your work primarily involves heavy video production, high-speed sports with massive telephoto lenses, or architectural work requiring constant screen-referencing, the ergonomics of the X Pro3 may feel restrictive. In those cases, a more traditional articulated-screen model from the same manufacturer might be a more efficient investment. The X Pro3 rewards those who have a specific vision and want a device that encourages them to look at the world, rather than at their settings.
Advanced Power and Storage Management
To ensure the device remains reliable during long-duration sessions, the storage configuration must be handled with care. The dual SD card slots should be set to "Backup" mode for critical events, writing the same data to both cards simultaneously. This provides an immediate safeguard against hardware failure. For casual use, "Sequential" mode allows for maximum capacity. Regarding power, using the "Power Management" menu to set "Auto Power Off" to 2 minutes balances readiness with battery conservation. It is also advisable to disable "High Performance" mode when the primary goal is maximizing shot count, although this will result in a slight delay when waking the device from sleep.
Conclusion
The X Pro3 is a testament to the idea that electronics can have personality and purpose beyond their specification sheets. By embracing a design that limits digital distractions, it offers a refined experience that focuses on the core tenets of observation and capture. Setting up the device requires a thoughtful approach to button mapping, viewfinder customization, and color profile management. When configured correctly, the hardware disappears into the background, leaving the user free to engage with their surroundings. While it may not be the optimal choice for every consumer, for the dedicated enthusiast who appreciates the blend of titanium durability and hybrid optics, there is simply no other device that offers the same level of engagement. Success with the X Pro3 is found not in mastering its menus, but in using those menus to create a tool that reacts as fast as your own eyes.